Today I am away from school because I am really sick. : ( But I have decided to blog and do some photoshop because I don't want to fall behind in work. Basically I have chosen my high resolution image - the owl eyes. As seen on my last blog. Below is the image anyway, just incase you missed it.
(Source: http://www.flickr.com/)
All I had to do was select one eye, I chose the left, you'll find out why later on. Then it was dragged onto the background image, it automatically creates a new layer. I simply changed the opacity to 50% and dragged the eye over the man's left eye. Resized it, created a mask on the layer and used the paintbrush tool to erase the outside and unwanted eye parts. I than copied the layer with the left eye so that it would look neat and symmetrical. I than dragged it over ontop of the right eye and went into 'Image' - 'Rotate' - 'Flip Layer Horizontal'. You have to make sure you've selected your desired layer so that you don't flip the wrong thing. You also have to make sure to click 'Flip Layer Horizontal' and NOT 'Flip Image Horizontal' because this will flip the background and not the layer desired. Than you place the eye where desired and make any touchups if wanted. Below is the final product.
Next lesson I am going to decide weather or not I want any extra features of my clan. If so I'll have to complete it next lesson.
The techniques used in the lesson:
- layer
- mask
- paint brush
- opacity
- rotate
Sunday, February 28, 2010
Photoshop Task - ASSIGNMENT 26.2.2010
The reason I'm blogging late is because I did'nt have a chance to post on Friday's lesson. Although now I will make up for the late blog. Below is the image from my last post.
(Source: http://www.flickr.com/)
Last lesson I had only completed the tiger teeth. The next stage was to change the Hue/Saturation of the tiger teeth to match the man's own teeth so that they blended. The HS (Hue/Saturation) was changed to colour preference "#f8eeda". This colour change gave the teeth a much whiter appearence. Below is the final image of the tiger teeth.
In the same lesson I also decided on the type of eyes that I wanted for my clan of two. The below image is the eyes that I will use and mask into my background. They are owl eyes, I love their powerful colour.
(Source: http://www.flickr.com/)
I am going to layer and mask these eyes into the face next lesson. But for now, in this lesson I've decided to take on an easier task and make a new layer and change the HS of the skin. I decided on a blue colour that I absolutley love. All I had to do was duplicate the background layer and name it 'skin'. Than I selected the face and chest area of the man with the lasso tool. I than entered the HS tool bar and changed my HS to my desired colour. Below is the image of my final product.
Next lesson I hope to complete the owl eyes and hopefully decide on another feature to add to my clan
The techniques I used in the lesson were:
- layer
- mask
- HS (Hue/Saturation)
- lasso
- paintbrush
(Source: http://www.flickr.com/)
Last lesson I had only completed the tiger teeth. The next stage was to change the Hue/Saturation of the tiger teeth to match the man's own teeth so that they blended. The HS (Hue/Saturation) was changed to colour preference "#f8eeda". This colour change gave the teeth a much whiter appearence. Below is the final image of the tiger teeth.
In the same lesson I also decided on the type of eyes that I wanted for my clan of two. The below image is the eyes that I will use and mask into my background. They are owl eyes, I love their powerful colour.
(Source: http://www.flickr.com/)
I am going to layer and mask these eyes into the face next lesson. But for now, in this lesson I've decided to take on an easier task and make a new layer and change the HS of the skin. I decided on a blue colour that I absolutley love. All I had to do was duplicate the background layer and name it 'skin'. Than I selected the face and chest area of the man with the lasso tool. I than entered the HS tool bar and changed my HS to my desired colour. Below is the image of my final product.
Next lesson I hope to complete the owl eyes and hopefully decide on another feature to add to my clan
The techniques I used in the lesson were:
- layer
- mask
- HS (Hue/Saturation)
- lasso
- paintbrush
Photoshop task - ASSIGNMENT 25.2.2010
Yesterday i forgot to blog. My bad.
I have been away for about two lessons I think. So I would have missed a few blogs. (Mr Powell).
These are the images that I combined yesterday. I missed the lessons that my teacher described to us emotions that we are going to have to use for our assignment. Below i have used an example of crazy.
(Source: http://www.flickr.com/)
I have decided to call my clan (assignment) *we have to create a two person clan of our choice* the Slee Stak.
Moving on. Yesterday I used a layer to add Tiger teeth to my man. My clan is going to have tiger teeth as a beginning point. The tiger that i used to take the teeth from I accidentally deleted but below is the image after I cut them out using the lasso tool and than layered them onto the background (man).
My next post is going to be about the change that I will have to make to the Hue/Saturation to the teeth to match the man's.
The techniques I used in the lesson were:
- layer
- lasso
- rectangular marquee tool
Sunday, February 14, 2010
Photoshop - Introduction to Masking Techniques
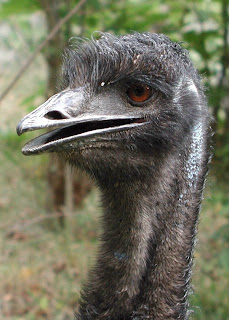
In Photoshop this term we've been exploring masking , and its many uses or techniques. So far for the last 3 weeks, 10 lessons we've had to use masking techniques to mesh together the images of a tree frog and an emu. Here is an example of the images.
- Tree Frog
This is the 'Background' of the project. Basically this just means that it's like the base that I'm going to use to build on top of. I will enhance the eyes through the Emu's head. I will do this through the mask that I will create right at the beginning of the project, than after i drag the image on top of the frog, re-size and change opacity to half. I will than use the eraser to 'clean' off any unwanted or excess head.

The Emu at the beginning of the project needs to be rotated horizontally. It will than be selected and dragged over to the frog and place on-top of it. Than the opacity is taken down and the eyes of the emu need to be on top of the Frog's than erased on the mask that is than made. Eventually when you are happy with the product the opacity is turned up to 100%. Than the next step is to duplicate the layers twice (2) and label them 'beak' and 'head'. On each layer the opposite part of the head will need to be erased. For example the beak layer will need to have erased the head but leave the beak. Than the hue/saturation may be changed to whatever colour is desired.
Techniques used are:
- combining images
- resize
- mask
- apple t (select/re-size)
- layers
- apple u (hue/saturation)
- colour and hue
This is my final product. NOT perfect...
- Tree Frog
This is the 'Background' of the project. Basically this just means that it's like the base that I'm going to use to build on top of. I will enhance the eyes through the Emu's head. I will do this through the mask that I will create right at the beginning of the project, than after i drag the image on top of the frog, re-size and change opacity to half. I will than use the eraser to 'clean' off any unwanted or excess head.

The Emu at the beginning of the project needs to be rotated horizontally. It will than be selected and dragged over to the frog and place on-top of it. Than the opacity is taken down and the eyes of the emu need to be on top of the Frog's than erased on the mask that is than made. Eventually when you are happy with the product the opacity is turned up to 100%. Than the next step is to duplicate the layers twice (2) and label them 'beak' and 'head'. On each layer the opposite part of the head will need to be erased. For example the beak layer will need to have erased the head but leave the beak. Than the hue/saturation may be changed to whatever colour is desired.
Techniques used are:
- combining images
- resize
- mask
- apple t (select/re-size)
- layers
- apple u (hue/saturation)
- colour and hue
This is my final product. NOT perfect...
Subscribe to:
Comments (Atom)


