Monday, November 1, 2010
Sunday, October 31, 2010
Website
I have done my entry page as well as a photo gallery and a synopsis page. I had to draw two pictures because i only have 1 from my actual movie because its all gone. therefore i drew money and a bank volt which is slightly un-distinguishable as a bank volt door but oh well. My entry page has a picture up the top and a small hook 'sentence to capture the audience'. I have almost completed the synopsis page.
Wednesday, September 1, 2010
progress on scene 3
i haven't blogged for a while. my bad.
anyways moving on. i have made a lot of process on scene 3, I've finished the police man, and he's walked through the other side and is approaching the couple with his gun pointing towards them. I want to figure out how to zoom the screen into the the police man, and have him shoot the gun and than the screen follow the gun to hit the girl and than the camera zoom out.
anyways moving on. i have made a lot of process on scene 3, I've finished the police man, and he's walked through the other side and is approaching the couple with his gun pointing towards them. I want to figure out how to zoom the screen into the the police man, and have him shoot the gun and than the screen follow the gun to hit the girl and than the camera zoom out.
Wednesday, August 18, 2010
todays lesson - progress on scene 3
today in class i drew the police car that will contain the police man that will shoot the lady. and than i also made the people walk towards the farrari that i completed drawing today.
Monday, August 9, 2010
Scene 3 today
I've done a small amount on the third scene and today i am planning on getting them through the door and a security guard to shoot them, i am also planning on having police sirens in the music in the background.
Wednesday, August 4, 2010
Sunday, August 1, 2010
Doors
today i finally completed scene 2...happiness. i altered a small amount of the whole scene and completed the opening and closing of the doors in the background and the perspective walking of the people going through the doors. now i will have to start work on scene 3. i think i either want them to grab cash in the vault or have a 3 minutes later in white on a black background and than them driving off and her getting shot. i was thinking of having police cars out the front but now i realise it will be too long and time consuming so i have chosen to have a security guard shoot them as they come out the doors. i was also thinking of possibly having them in the lobby of the bank and people on the ground shot with blood but i think that might take too long as well.
Sunday, July 25, 2010
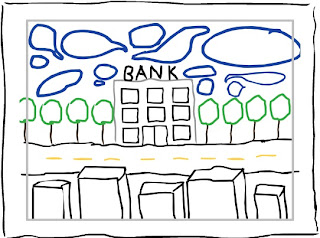
Scene 1
The beginning of scene 1 opens on a street with a bank and high rises in the foreground. Below is a picture of scene 1.
The scene than continues to have two people a man and a woman walking from either sides, which they than meet in the middle. When the two people are in the middle they than share a few words of love which you don't hear. Love hearts are used to represent the relationship of the people. Below is a still of the two with hearts above their heads in the middle.
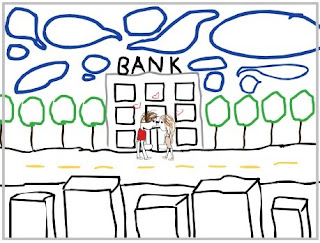
The people than continue to walk through the banks doors. Below is a still of the two people walking through them. The technique that I used to give the doors the appearance of opening and closing was; one frame have two lines representing either doors, second frame move further apart etc.
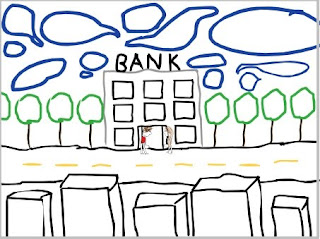

Completion of second scene
I haven't blogged for ages because i lost my password and didn't realize you could send it to yourself. I have completed scene 1 and just completed scene 2. I will be giving a detailed description about both scenes accompanied by pictures.
Wednesday, June 2, 2010
Attempt at an i-stop
lately i've been thinking that I could do an i stop instead of an animationish. i really like making my own little characters so i don't know ill think about it. Below is an i-stop that i just did in 2 seconds today.
this was in early term 2 or late 1 and i misplaced the video link so yes.
this was in early term 2 or late 1 and i misplaced the video link so yes.
Thursday, May 20, 2010

Wednesday, May 19, 2010
Creative Media - first attempt
Below is the image of my first scene it's only one slide and the first attempt. It just shows a bank and two characters, a man and a woman.

I will be uploading an image of my storyboard in my next blog, i had done it a long time ago but needed to find a scanner, so I will be able to do it soon. In next lesson I hope to complete this scene and started the next one.

I will be uploading an image of my storyboard in my next blog, i had done it a long time ago but needed to find a scanner, so I will be able to do it soon. In next lesson I hope to complete this scene and started the next one.
Sunday, May 9, 2010
Creative Media - animationish
This term in Creative Media we are re-learning how to use animationish, a program designed to animate drawings made on the computer through the program. I already wrote up a storyboard but accidentally deleted it so, I'm going to re-write it next lesson. I already decided that my animationish is going to be based on a bank robery- love story. It decipitates a story of self discovery and realisation of morals and self being. Through various scene's I will attempt to portray this story.
Monday, April 12, 2010
Creative Media - Emotions Task 2.3.2010 *happy
Happy Image 1.

The happiness of this image is strongly portrayed through her mouth and eyes. The smile is obviously the focal point of her happiness. The distraction of the eyes upwards suggests happiness in a slight form. The position of her arms are also suggestive of her eagerness towards something. This position is greatly associated with happiness.
(Source: http://www.tvfanatic.com/images/gallery/joanna-garcia-as-megan-smith.jpg 2.3.2010)
Happy Image 2.

This man's dimples are strongly suggestive of his happiness also his mouth, eyes and partial peace sign.The round dimply, cheeks, large smile and peace sign are all greatly associated with happiness. His limbs or hands have been used to show his emotion of happiness through the greatly associated peace sign of happiness.
(Source: http://farm4.static.flickr.com/3237/2323880842_d6ef06cedf.jpg 2.3.2010)
Happy Image 3.

Again this child's large dimples, cheeks and mouth are strong persuasive techniques when suggesting the emotion of happiness. The closed eyes are pushed together from the 'smiling' cheeks. The limbs don't really suggest any happiness.
(Source: https://blogger.googleusercontent.com/img/b/R29vZ2xl/AVvXsEgeW9FS91aGhopL5fDPahauPiUZWWRuYg6hxsR2Pr6rCiqdDDF-Xn5tRGpIbhouLjcOYAdRvQFQ5N31GL74CSSwAlUkSf-_DCEIQSPz0htlhx4xNKjDFfwfOyBa2JkrxqhzJmYSt7cDReLg/s400/happy-person.jpg 2.3.2010)
Creative Media - Emotions Task 2.3.2010 *sad
Sad Image 1.

The strong representation of sadness is portrayed through this babies mouth, eyes and cheeks. The turning down or pouting of the child's lips highly persuades the viewer to its emotion, this is due to the common belief of upside down smiles (smiles associated with happiness) and the opposite of a smile is sadness. The wrinkles shown next to and beneath its mouth create an even greater representation of sadness. The closed eyes represent the emotion of solemness, deep thought and of course sadness. Again strong emotions associated with sadness. Now the cheeks, the wrinkles coming from the eyes of the baby cause the cheeks to appear as if turning down, down again associated with sadness.
(Source: http://www.insidesocal.com/tv/lucas-sad-face.jpg 2.3.2010)
Sad Image 2.

The open and down turned mouth associated with the emotion sadness is an indication that this child is upset. The large lines coming from the bottom of the nose to the top of the mouth shows that the cheeks are even dragging down to the open mouth. The dimples in the chin could also be associated with the child's upset. The large frown on the child's forehead and the down turning of the eye brows show a very strong indication of sadness. Finally the almost closed shape of the eyes could be indicating that the child is crying.
(Source: http://www.usask.ca/communications/ocn/06-july-07/images/sad_face.jpg 2.3.2010)
Sad Image 3.

The closeness of the eyes indicates tears of sadness and sorrow. The recoiling of the tongue in the open mouth represents a loud bellowing noise coming from the child's mouth. The chin's' shows that the head is being pushed back towards the neck. When you are upset you tend to put your head back or down in an attempt to hide your face. Although this child is openly upset and is pushing their head back and obviously crying to another person. Again the large dimply lines from the nose to the mouth are a large representation of sadness.
(Source: http://geokteng.files.wordpress.com/2010/01/sad-face04.jpg 2.3.2010)
Wednesday, March 24, 2010
Creative Media - ASSIGNMENT final submition of avatar 1
From my last post I have finally completed my first avatar out of two. Below is the final product.

Evaluation
The basic emotion I chose at the beginning of the assignment after looking through and evaluation various options I chose contempt. The emotion of contempt is portrayed through the limbs, the arm on the shoulder, the eyes, looking away and staring into space and the slightly relaxed shape of the body. When I started off my process I found changing the colour of the skin exceptionally easy from the emu and the frog task it literally took me 20 seconds to do. After I masked the skin layer *duplicate layer from the background, I erased the excess hue/saturation around the body, the shirt and the hair. I found the hair easier at the top of the head, and than when I progressed to the seperate strands of hair I found that quite difficult. I found it extremley time consuming and it stressed me out. I had to zoom in quite closely and than critiquely use the paint tool on the mask to bring out the small strands of hair. I actually completed all of my avatar and than restarted due to some of the shirt as I didn't mask and erased some I didn't want erased, it was minute but I still restarted.
Mr Powell I found when you had the one-on-one help it was much better and the class demonstrations at the beginning of the term were extemley helpful. Perhaps improve the list on the board process though. I do believe I used my time well.
When I was away I did alot of blogging and worked on my avatar. I don't get distracted during class which is a plus. I tended to blog after school sometimes instead of during class, I did do a few during class but it was just easier to remember than waste time without Mr. Powell if I needed help with the actual photoshop task. I am actually really pleased with this avatar. If I had to do anything over I wouldn't, not with this avatar. I found the process really exciting, as I love photoshop and I think I will find it very useful when I want to ever use photoshop again. I never really knew about photoshop but now I feel like I know so much more.
Creative Media - ASSIGNMENT 12.3.2010
My second avatar is my dog. I have chosen him because I want to have an animal in my clan. Below is the image of him.


I used all of the techniques from my previous avatar and my practice one as well. The only thing I don't need to do is the ears because he already has them. Below is the image of my final product.

Creative Media - ASSIGNMENT 22.3.2010
Since last lesson I have made a lot of improvements such as the ears and a slight adjustment of the teeth. Below is the image of the previous weeks work without its improvements.

Below is the improved image of my assignment minus the dots which I will soon add in.


Below is the improved image of my assignment minus the dots which I will soon add in.

Thursday, March 11, 2010
Creative Media - ASSIGNMENT 10.3.2010
It is now time to begin my actual assignment and copy the techniques I used for my man. Below is the image I have found and I am planning to use.

(Source: flickr.com)
The emotion I have chosen for the image above i believe is contempt. So far I have done every single proccess excluding the ears. Below is the image.
I still have to add the ears and I also am contemplating whether or not the hair looks alright because I had to erase some of the hair.
The techniques used were:
- layer
- mask
- hue/saturation
- paintbrush
- eraser
- lasso
- eyedropper

(Source: flickr.com)
The emotion I have chosen for the image above i believe is contempt. So far I have done every single proccess excluding the ears. Below is the image.

I still have to add the ears and I also am contemplating whether or not the hair looks alright because I had to erase some of the hair.
The techniques used were:
- layer
- mask
- hue/saturation
- paintbrush
- eraser
- lasso
- eyedropper
Creative Media - ASSIGNMENT 1.3.2010
I have finally finished my man that I am going to use for an example in my finall assignment. I'm going to use two other images and use the techniques that I have used for my man. Below is my man finally finished.
I also decided to add ears to my man. I thought it added to the animalistic feel of my avatar. Below is the image I used to get the ears from.

(Source: flickr.com)
I lassoed the ears and changed the hue to match the skin, then layered them and erased some of the outside, the bits I didn't want.
The techniques I used were:
- lasso
- hue/saturation
- layer
- mask

I also decided to add ears to my man. I thought it added to the animalistic feel of my avatar. Below is the image I used to get the ears from.
(Source: flickr.com)
I lassoed the ears and changed the hue to match the skin, then layered them and erased some of the outside, the bits I didn't want.
The techniques I used were:
- lasso
- hue/saturation
- layer
- mask
Monday, March 1, 2010
Photoshop Task - ASSIGNMENT 2.3.2010
Another idea I had for my clan's facial features is luminescent dots on their faces, like avatar but different in its own right. Before I attempt this I am also contemplating bringing through the pupils of the man's eyes so that they stand out in the owl's yellow outsides. Below is the image without this step.

Below is the image with the pubils brought through.

I'm stuck, I don't know what to do. Wether to have them or not? I'm going to leave it with the pupils of the owl for now and if I choose to change them I can later on, but for now I'm going to make a new post after I do the luminescent dots on my man in photoshop.
The techniques used were:
- mask
- paintbrush
Creative Media - Emotions Task 2.3.2010 *crazy
The three emotions that I wish to research are crazy, sad and happy.
Crazy Image 1.

The first image that I have chosen to represent crazy expressions or facial features I believe is quite a strong representation with its excentuated features such as the mouth, eyes, nose and limbs (hands). Mr Powell was talking about how limbs are extremely important features of an expression. The flaring of the nostrils is an instant sign of some emotional imbalance. An alternative emotion for this image is also anger but I think anger is associated with craziness. The raising of the eyebrows and the wideness of the eyes is also again a strong sign of a strong emotion. The curling of the fingers and the wideness of the mouth are another representation of distress and the persons evident disapproval of the situation.
(Source: http://beautydepot.files.wordpress.com/2008/03/crazyface.jpg 2.3.2010)
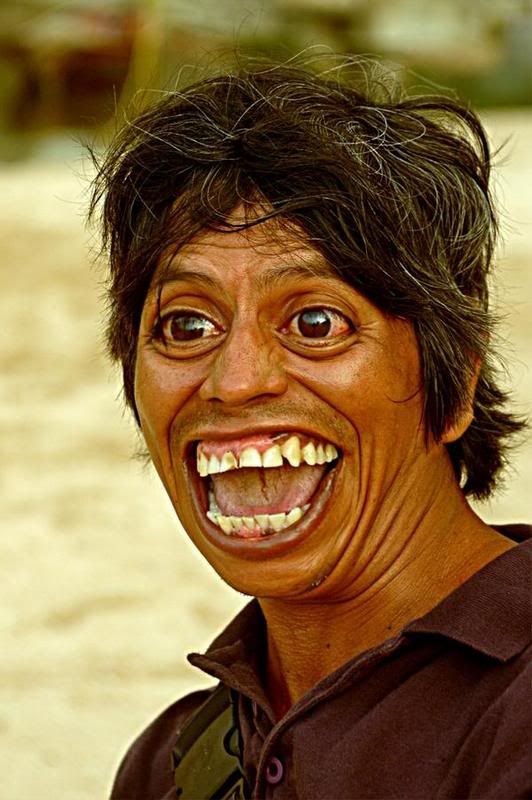
Crazy Image 2.

The second image of craziness is shown strongly through the boldness of they eyes. The eyes appear to almost pop out of the head in a manner that would suggest an un usual feature of a human, something this unusual is generally classified as crazy or weird. The wideness of the mouth and the state of the teeth again shows a sign of mal-hygiene when a person is mentally unstable they generally disregard hygiene. A common sign of a person who is crazy is a wide mouth, either in amusement, awe or happiness. The over exaggurated smile is probably due to an unamusing sight that this person finds amusing.
(Source: http://i131.photobucket.com/albums/p297/jovitagaliciaaustin/crazy_face.jpg 2.3.2010)
Crazy Image 3.

The strong accentuated features of the baby's eyes and mouth are the main suggestion towards the crazy expression. Some kind of amusement would have triggered the baby's strong expressional smile, which could be taken as too strong and converted to craziness. Again the wideness of the eyes is suggestant of a crazy expression's main feature. As in both of the other images the mouth has also been in a specific type of shape in the second image the expression was also a wide grin.
(Source: http://www.crybabiez.com/crazy-face.jpg 2.3.2010)
Crazy Image 1.

The first image that I have chosen to represent crazy expressions or facial features I believe is quite a strong representation with its excentuated features such as the mouth, eyes, nose and limbs (hands). Mr Powell was talking about how limbs are extremely important features of an expression. The flaring of the nostrils is an instant sign of some emotional imbalance. An alternative emotion for this image is also anger but I think anger is associated with craziness. The raising of the eyebrows and the wideness of the eyes is also again a strong sign of a strong emotion. The curling of the fingers and the wideness of the mouth are another representation of distress and the persons evident disapproval of the situation.
(Source: http://beautydepot.files.wordpress.com/2008/03/crazyface.jpg 2.3.2010)
Crazy Image 2.

The second image of craziness is shown strongly through the boldness of they eyes. The eyes appear to almost pop out of the head in a manner that would suggest an un usual feature of a human, something this unusual is generally classified as crazy or weird. The wideness of the mouth and the state of the teeth again shows a sign of mal-hygiene when a person is mentally unstable they generally disregard hygiene. A common sign of a person who is crazy is a wide mouth, either in amusement, awe or happiness. The over exaggurated smile is probably due to an unamusing sight that this person finds amusing.
(Source: http://i131.photobucket.com/albums/p297/jovitagaliciaaustin/crazy_face.jpg 2.3.2010)
Crazy Image 3.

The strong accentuated features of the baby's eyes and mouth are the main suggestion towards the crazy expression. Some kind of amusement would have triggered the baby's strong expressional smile, which could be taken as too strong and converted to craziness. Again the wideness of the eyes is suggestant of a crazy expression's main feature. As in both of the other images the mouth has also been in a specific type of shape in the second image the expression was also a wide grin.
(Source: http://www.crybabiez.com/crazy-face.jpg 2.3.2010)
Sunday, February 28, 2010
Photoshop Task - ASSIGNMENT 1.3.2010
Today I am away from school because I am really sick. : ( But I have decided to blog and do some photoshop because I don't want to fall behind in work. Basically I have chosen my high resolution image - the owl eyes. As seen on my last blog. Below is the image anyway, just incase you missed it.

(Source: http://www.flickr.com/)
All I had to do was select one eye, I chose the left, you'll find out why later on. Then it was dragged onto the background image, it automatically creates a new layer. I simply changed the opacity to 50% and dragged the eye over the man's left eye. Resized it, created a mask on the layer and used the paintbrush tool to erase the outside and unwanted eye parts. I than copied the layer with the left eye so that it would look neat and symmetrical. I than dragged it over ontop of the right eye and went into 'Image' - 'Rotate' - 'Flip Layer Horizontal'. You have to make sure you've selected your desired layer so that you don't flip the wrong thing. You also have to make sure to click 'Flip Layer Horizontal' and NOT 'Flip Image Horizontal' because this will flip the background and not the layer desired. Than you place the eye where desired and make any touchups if wanted. Below is the final product.

Next lesson I am going to decide weather or not I want any extra features of my clan. If so I'll have to complete it next lesson.
The techniques used in the lesson:
- layer
- mask
- paint brush
- opacity
- rotate
Photoshop Task - ASSIGNMENT 26.2.2010
The reason I'm blogging late is because I did'nt have a chance to post on Friday's lesson. Although now I will make up for the late blog. Below is the image from my last post.

(Source: http://www.flickr.com/)
Last lesson I had only completed the tiger teeth. The next stage was to change the Hue/Saturation of the tiger teeth to match the man's own teeth so that they blended. The HS (Hue/Saturation) was changed to colour preference "#f8eeda". This colour change gave the teeth a much whiter appearence. Below is the final image of the tiger teeth.

In the same lesson I also decided on the type of eyes that I wanted for my clan of two. The below image is the eyes that I will use and mask into my background. They are owl eyes, I love their powerful colour.

(Source: http://www.flickr.com/)
I am going to layer and mask these eyes into the face next lesson. But for now, in this lesson I've decided to take on an easier task and make a new layer and change the HS of the skin. I decided on a blue colour that I absolutley love. All I had to do was duplicate the background layer and name it 'skin'. Than I selected the face and chest area of the man with the lasso tool. I than entered the HS tool bar and changed my HS to my desired colour. Below is the image of my final product.

Next lesson I hope to complete the owl eyes and hopefully decide on another feature to add to my clan
The techniques I used in the lesson were:
- layer
- mask
- HS (Hue/Saturation)
- lasso
- paintbrush

(Source: http://www.flickr.com/)
Last lesson I had only completed the tiger teeth. The next stage was to change the Hue/Saturation of the tiger teeth to match the man's own teeth so that they blended. The HS (Hue/Saturation) was changed to colour preference "#f8eeda". This colour change gave the teeth a much whiter appearence. Below is the final image of the tiger teeth.

In the same lesson I also decided on the type of eyes that I wanted for my clan of two. The below image is the eyes that I will use and mask into my background. They are owl eyes, I love their powerful colour.

(Source: http://www.flickr.com/)
I am going to layer and mask these eyes into the face next lesson. But for now, in this lesson I've decided to take on an easier task and make a new layer and change the HS of the skin. I decided on a blue colour that I absolutley love. All I had to do was duplicate the background layer and name it 'skin'. Than I selected the face and chest area of the man with the lasso tool. I than entered the HS tool bar and changed my HS to my desired colour. Below is the image of my final product.

Next lesson I hope to complete the owl eyes and hopefully decide on another feature to add to my clan
The techniques I used in the lesson were:
- layer
- mask
- HS (Hue/Saturation)
- lasso
- paintbrush
Photoshop task - ASSIGNMENT 25.2.2010
Yesterday i forgot to blog. My bad.
I have been away for about two lessons I think. So I would have missed a few blogs. (Mr Powell).
These are the images that I combined yesterday. I missed the lessons that my teacher described to us emotions that we are going to have to use for our assignment. Below i have used an example of crazy.

(Source: http://www.flickr.com/)
I have decided to call my clan (assignment) *we have to create a two person clan of our choice* the Slee Stak.
Moving on. Yesterday I used a layer to add Tiger teeth to my man. My clan is going to have tiger teeth as a beginning point. The tiger that i used to take the teeth from I accidentally deleted but below is the image after I cut them out using the lasso tool and than layered them onto the background (man).

My next post is going to be about the change that I will have to make to the Hue/Saturation to the teeth to match the man's.
The techniques I used in the lesson were:
- layer
- lasso
- rectangular marquee tool
Sunday, February 14, 2010
Photoshop - Introduction to Masking Techniques
In Photoshop this term we've been exploring masking , and its many uses or techniques. So far for the last 3 weeks, 10 lessons we've had to use masking techniques to mesh together the images of a tree frog and an emu. Here is an example of the images.

- Tree Frog
This is the 'Background' of the project. Basically this just means that it's like the base that I'm going to use to build on top of. I will enhance the eyes through the Emu's head. I will do this through the mask that I will create right at the beginning of the project, than after i drag the image on top of the frog, re-size and change opacity to half. I will than use the eraser to 'clean' off any unwanted or excess head.
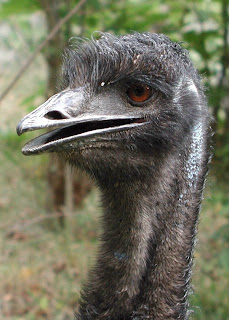
The Emu at the beginning of the project needs to be rotated horizontally. It will than be selected and dragged over to the frog and place on-top of it. Than the opacity is taken down and the eyes of the emu need to be on top of the Frog's than erased on the mask that is than made. Eventually when you are happy with the product the opacity is turned up to 100%. Than the next step is to duplicate the layers twice (2) and label them 'beak' and 'head'. On each layer the opposite part of the head will need to be erased. For example the beak layer will need to have erased the head but leave the beak. Than the hue/saturation may be changed to whatever colour is desired.
Techniques used are:
- combining images
- resize
- mask
- apple t (select/re-size)
- layers
- apple u (hue/saturation)
- colour and hue
This is my final product. NOT perfect...

Subscribe to:
Comments (Atom)